
Official websites use .gov
A .gov website belongs to an official government organization in the United States.
Secure .gov websites use HTTPS
A lock (
) or https:// means you’ve safely connected to the .gov website. Share sensitive information only on official, secure websites.
Taking Measure
Just a Standard Blog
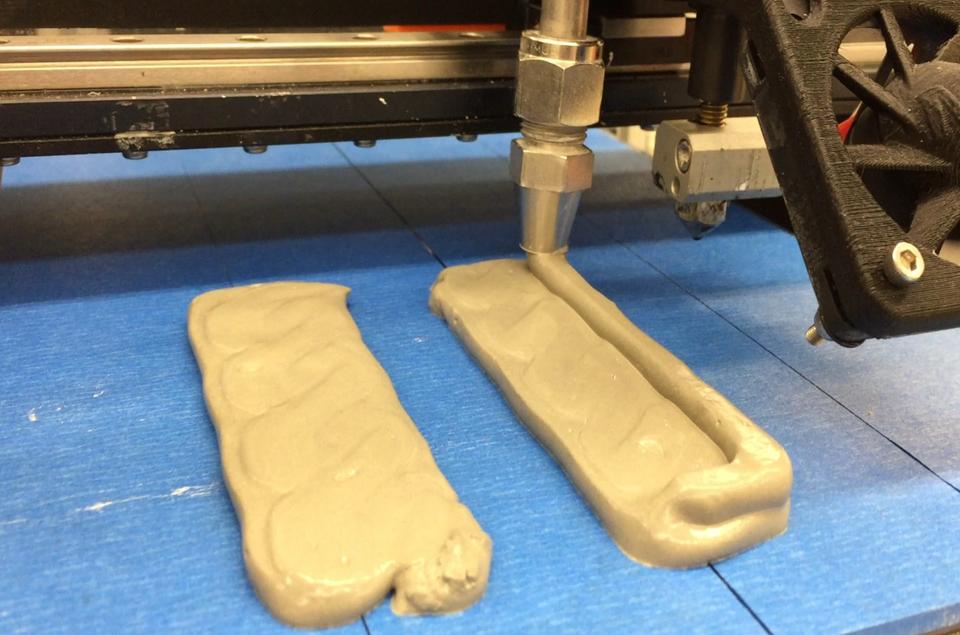
Here, the printer is printing layers of cement paste. This is the ideal custard-like consistency needed for additive manufacturing.
Since they came out a few years ago, the capabilities of commercially available 3-D printers have radically expanded. At first, they could only print little things out of plastic, but now people have begun to print working cars and even bridges. People are actively experimenting with how to print with more materials like metals, and, more recently, concrete.
This summer, I participated in the Summer Undergraduate Research Fellowship (SURF) program at NIST. Upon being accepted, I was assigned to a project titled “Additive Manufacturing of Cement.” I was intrigued by the title alone, as I had experience with 3-D printing—but I had not, however, worked with cement or concrete. I found this project to be a good opportunity for expanding my knowledge of materials and their applications in manufacturing. My advisor, Scott Jones, told me that he had not even studied cementitious materials until he started his Ph.D., which was reassuring to me.
Because 3-D printing of cement is becoming more widespread, Scott and his team at NIST want to study the process and make recommendations about how to improve it.
We had two primary areas of concern. First, we wanted to find out which cement formulations work best for printing. Second, we wanted to determine the optimal program settings for the printer itself so we can print the best quality structures.
Perfecting the Mix, Cracking the Code
The additive manufacturing approach that we used is known as fused filament modeling or “material extrusion.” In this process, a material is pushed through a nozzle and laid down to build up a structure layer-by-layer. Typical 3-D printers use a plastic filament that looks a lot like the kind you might load into a weed whacker. The filament is forced through a heated nozzle to make it malleable and soft enough to stick to the previous layer. 3-D printing with cement works essentially the same way, except the cement isn’t heated and the nozzle is bigger.
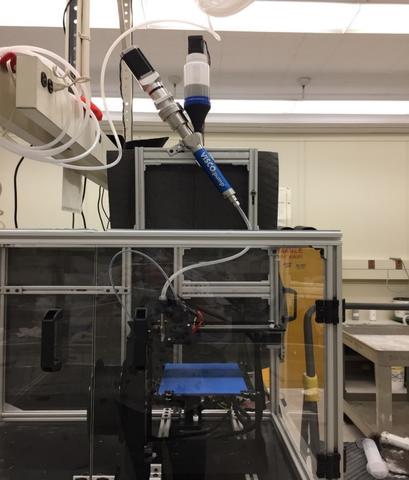
Scott and his past SURF students modified a commercially available conventional 3-D printer to deposit cement paste. They also experimented with different paste mixes to see how easily they can be pumped and how well they form standing structures rather than puddles. This summer, I furthered this research by not only optimizing the cement paste for printing but also experimenting with how to introduce reinforcements—here in the form of a printed plastic mesh—to the concrete.
(Reinforcing concrete to make it more resistant to being pulled apart is standard when building conventional structures, but the practice has not yet been incorporated into cement-based additive manufacturing, so this is a first step toward that.)
To do this, I had to reprogram our printer so that it would alternately deposit layers of cement paste and reinforcing plastic mesh for the paste to diffuse into. Because I wanted something a little stronger than conventional plastic, I decided to use a carbon fiber-infused filament. This seemed like the best option because carbon fiber materials are already used to reinforce concrete for some applications.
We spent the better part of June tweaking the 3-D printer’s code. Thankfully, because the software that runs the printer’s CPU and the software that processes 3-D models for printing are both open source, I could modify the code anyway I needed to—very handy when you’re trying to force a cement-shaped peg through a plastic-shaped hole. Despite the flexibility of the code, the process was still pretty frustrating, but I eventually figured out how to get the printer to deposit layers of cement paste with its pump, switch over to its plastic extruder, and then switch back to the pump. With that done, I began to print samples to see if the carbon fiber-infused plastic reinforcements had any noticeable effect on the material’s strength and durability.
Printed Concrete Bricks, Carbon-Fiber Straw
I printed several rectangular, brick-like artifacts and observed not only the behavior of slightly different mixes but also how their properties changed over time. Soon after we prepare the mix, the concrete has the consistency of melted ice cream. In this state, it flows very easily through the pump and nozzle, but it cannot support its own weight very well and collapses into a puddle. If we let too much time pass after mixing, however, the material takes on the consistency of clay, which, while it can support itself, is very difficult to move through the pump. We found that the ideal consistency was more like a thick custard, which seems to develop anywhere between 35 and 80 minutes after mixing. This behavior lined up with the data we collected, but you could only fully appreciate it by seeing it in action. After cleaning up puddle after puddle of brownish-gray goo, it’s amazing how satisfying it was to see the cement come out of the nozzle in a smooth bead and behave the way I wanted it to.

Printing the reinforcing mesh was another finicky, yet ultimately rewarding process. Lots of failures in the form of stringy, bird’s nest-like messes of melted plastic finally led to the production of excellent final specimens. They were still ugly, but I’ve learned that creating prototypes often requires prioritizing function over aesthetics.
Over the course of running print after print after print, I picked up several other helpful habits. One of the most important was being excessively careful in preparing the cement and labeling every specimen with as much information as possible. Cement paste formulations are very sensitive to small changes in the proportions of the ingredients, and no matter how good my memory is, all the vaguely rectangular blobs I produced tended to look the same. Documenting made all the difference.
Reaching the Breaking Point
It wasn’t until toward the end of my time at NIST that I got the opportunity to physically put the printed specimens to the test. First, I tested some specimens that were cast in a mold and not printed at all. One was pure cement and the other had layers of carbon-fiber mesh inside. We needed some confirmation that, additive manufacturing aside, the mesh would actually reinforce the brick. With our fingers crossed, we subjected the specimens to a three-point bend test until they broke. Our preliminary results showed that the reinforced bricks were truly a fair bit stronger than the ones without reinforcement.
Whew! My efforts had not been in vain.
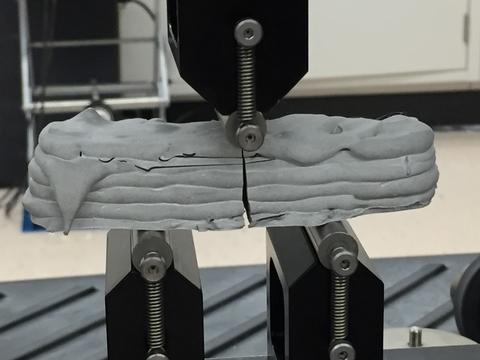
I then tested specimens that we had printed, some of which had reinforcement, some without. Again, the data seemed to suggest that the ones we had reinforced with the carbon-fiber mesh required more force to break. Seeing the results of our preliminary tests going in this direction was really great. There is, of course, still lots more testing to be done. One of the drawbacks of doing undergraduate research for only 10 weeks is that you don’t have time to do the work necessary to draw significant conclusions.
Maybe next year!
Putting It All Together
Overall, the SURF experience was very valuable to me. I had done research before at my university, but the scope of it was narrow and my advisor was the only accessible expert on the topic. Here at NIST, I worked in a department full of experts working in specialized labs studying the behavior of cementitious material, so I had access to all the knowledge and instrumentation that I needed. With my project in particular, I was pleased with how my time was divided. True, I spent much of it just tweaking the 3-D printer, but I was also taught different ways to characterize cement-based material and ended up producing and testing real specimens. I liked being able to see so many facets of this research instead of being limited to looking at this topic through a keyhole.
What is especially valuable about the research I did is that it allowed me to apply my existing knowledge of 3-D printing and manufacturing technology while gaining knowledge in materials characterization and cementitious materials in general topics that would not be covered in any of my classes. I’m excited to see how the field of concrete additive manufacturing will develop in the future, and I’m proud of the small contribution I made to optimizing the process.
About the author

Related posts


Comments
When laying cement and/or concrete by hand, masons use blades in a buttering method when not pouring into a form. Would it be better to lay the material via a blade the width of the desired end item? This would be like that used to lay ink on a rotary painting press. Also have multiple heads driven by the same system. One with a wide blade to laying cement. Another to lay the reenforcing mesh. And, another to hold slide blades to function as a moving form to allow the sides to set during the flowing process. I believe that this would allow the system the flexibility to run with various compositions of cement and/or concrete.
Nice Post… Keep It Up…
Thanks for shearing this kind of information with us.. it’s very helpful..
I've been meaning to read this and just got around to it now. Very interesting post and research. Nice work Austin! Great to see a UNH Charger working on the forefront of this exciting and emerging technology.
James M. B.S., B.S. 2002