As Good as it Gets: NIST Develops Its Fourth Generation Wire Micrometer that Rivals Best in the World
A finer way to measure fine wire.

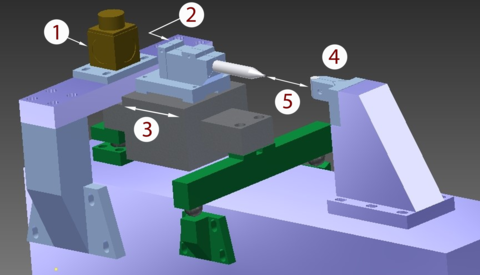
The main structural components of the new NIST micrometer--a device for measuring the thickness of fine wire, narrow fibers and similar objects—are made of Invar, a nickel-iron alloy that does not react to small changes in temperature. As a result, the measuring device is less prone to error than other state-of-the-art instruments. A laser beam enters from the left side of the drawing and enters a beam splitter cube (1), which divides the beam into two parts. One part remains in the cube, is reflected from a side mirror back towards the center and serves as the reference beam. The other part hits the retroreflector (2). As the floating carriage (3) moves away from the splitter cube and toward the back end of the anvil (4), the distance between the retroreflector and the cube splitter varies (5 When the two beam are brought back together, the laser reports the change in distance.
Researchers at the National Institute of Standards and Technology (NIST) have developed a dramatically improved laser-based instrument that measures the diameter of fine-gauge wires, fibers and other objects only about three times the thickness of a human hair. Known as a laser micrometer, the device’s accuracy equals that of its state-of-the-art counterparts but is cheaper, simpler to operate and easier to maintain.
NIST scientists John Stoup and Ted Doiron reported their findings in the December 15, 2020 issue of Metrologia.
The new micrometer uses an advanced laser displacement interferometer, which relies on light to measure the thickness of objects held between two metal contacts. With the new system, researchers can measure the diameter of any object less than 50 millimeters wide, including fine-gauge wires and fibers, with an uncertainty of just 2 nanometers. That’s better than twice the accuracy of previous laser micrometers developed at NIST.
Stoup and Doiron fabricated the new micrometer almost entirely out of Invar, a nickel-iron alloy known for its thermal stability. That means the material does not react to small changes in temperature, resisting expansion or contraction. As a result, the measuring device is less prone to error than other state-of-the-art instruments.
In fact, the improvement “puts the new NIST micrometer at a level equivalent to the best in the world,” said Stoup. Moreover, the NIST micrometer is less expensive and simpler to operate. For instance, because the NIST instrument is not as automated as other state-of-the-art instruments, it is cheaper to build, simpler in design and easier to keep under tight statistical control.
“It’s always a challenge to achieve best in the world performance without breaking the bank,” Stoup said.
Manufacturers are working with fibers and wires much thinner than they had even a decade ago for optical communications and on-chip electrical networks. This has driven the need for a laser micrometer that can measure tiny diameters with high accuracy and establish standard-diameter “master” fibers that can be used as references to assess the diameter of other fibers. At the other end of the scale, there is a growing need to measure the size of large, centimeter-diameter pressure pistons and cylinder gauges, which the NIST micrometer can also perform. Because the pressure a piston exerts is proportional to its area, even small errors in measuring the piston’s diameter may produce critical errors in calculating pressure.
Measuring the diameter of thin fibers and wires is a delicate operation because these objects can deform, or change their shape, relatively easily. If those deformations are not taken into account, they could lead to a significant error in measured size. To account for the deformation, the NIST researchers designed their micrometer so that they could vary the force applied by the contacts that hold the object in place. By measuring the variations in diameter of the object when different contact forces were applied, the researchers were able to extrapolate the diameter when no force is exerted on the object, the undeformed diameter.
The new design allows researchers to operate the device remotely, eliminating the possibility of introducing heat into the system through human contact. The researchers also engineered a more stable way for the carbide contacts to hold the measured object. All of these improvements increased the accuracy of the device.
Paper:
John Stoup and Ted Doiron. A Novel High Accuracy Micrometer for the Measurement of Diameter. Metrologia 58(2), December 2020. DOI: 10.1088/1681-7575/abd3b2.

